FOAM ARMOR
How to do it and where to begin
So, think you're ready to start a foam Halo costume? Well get to readin. :P
The foam method DOES have it's ups and downs. If you don't have a whole lot of "crafty" talent, foam building might be a little tricky at first and it might take some time to understand how to make it work. However, if you understand it and have no problems working with it, you can get a decent looking costume done in a short amount of time.
The foam method DOES have it's ups and downs. If you don't have a whole lot of "crafty" talent, foam building might be a little tricky at first and it might take some time to understand how to make it work. However, if you understand it and have no problems working with it, you can get a decent looking costume done in a short amount of time.
Setting Up Your Template In Pepakura
Now, you might have been lucky and managed to find the armor pieces you need already converted to a "foam file". If you have, you can skip down to "Template Preparation". Otherwise, you should keep reading from here.
If you need to make the file "foam friendly" on your own, you will need to understand and realize the thickness of the foam. A LOT of the thin pieces of the file will not be needed and you can just move them off to the left side in pepakura.
If you need to make the file "foam friendly" on your own, you will need to understand and realize the thickness of the foam. A LOT of the thin pieces of the file will not be needed and you can just move them off to the left side in pepakura.
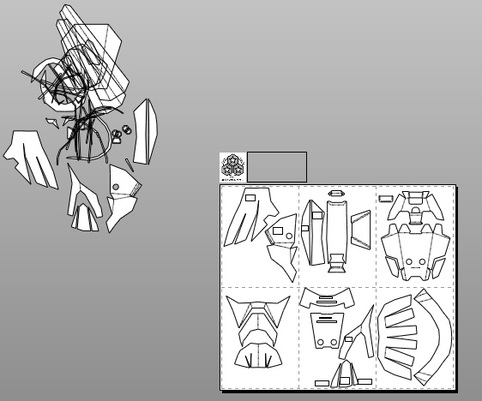
See the mess of pieces to the left? Those are pieces that were not needed. Another thing you will notice is that when creating a foam file, you also use less card stock to print stuff out. This is a file I made into a foam friendly version for myself. It is the HD MKVI shin which was modified and has a little more detail added to it than the regular HD MKVI shin. Since the shin does have some symmetrical pieces, I focused on keeping half of the shin pieces. When I need to make the same piece for the other side of the shin, I just flip my template over, trace it onto the foam and then I will end up with pieces needed for both sides of the shin. To make this more evident, look at the first page of my templates. See those pieces? They appear on both sides of the shin and all I do is flip it over to create the piece for the other side. :) Get it? :P When done correctly, all those pieces will create a full MK VI shin. :)
Making the foam pieces
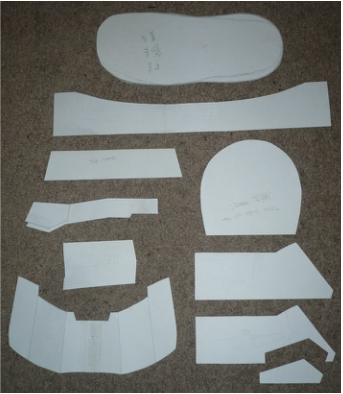
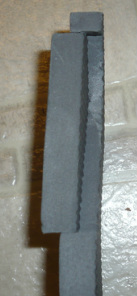
Here is a foam template I have cut and ready for the Halo Reach boot. Some of these pieces were scratch built as I looked at many reference pictures to make the boot more accurate.
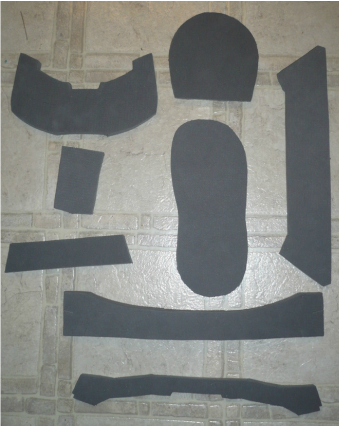
Now here is what my pieces look like after tracing my templates onto the foam and getting them all cut out. You will notice that there are less foam pieces than the amount of templates that were cut out. In THIS case, that is because of the fact that my templates were scratch built and I was a little odd about how I did it. XD lol You will see the piece that is longways to the right and THAT piece is created from the 2 templates in the lower right of the above image. Even the foam piece that is at the very bottom was done by using half of a template, tracing it then flipping it over to create the other half. Just study the 2 images and pay attention to all the pieces and you may be able to figure out what I did. :P
Now you can start adding detail. :) If you look at the image of my templates, you will see the piece on the bottom right that has that small piece cut out. I took that template and placed it over the corresponding foam piece.
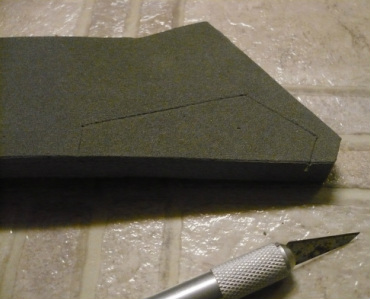
Next, I used an exacto knife to trace the area on the foam. You can clearly see the line in the image. I prefer to use an exacto knife when I trace ALL my templates onto the foam because I can still see the lines AND I don't get pen or marker all over my hands when touching the foam. XD
NOTE: You do NOT have to use a VERY sharp exacto knife to do this. You are only trying to create a good line that you can see so you know where to make your cut. You're not fully cutting into the foam. ;)
NOTE: You do NOT have to use a VERY sharp exacto knife to do this. You are only trying to create a good line that you can see so you know where to make your cut. You're not fully cutting into the foam. ;)
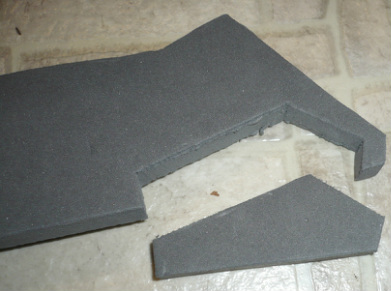
Next I simply cut the piece out and I end up with this.
|
|
Now that little piece I cut out will help for the detail in this area. Due to the thickness of the foam, this is VERY helpful. I simply put the piece in place and estimate about where I need this to be. This method can be used for ANY area that requires detail like this. :)
Once I have the piece in place, I first start on a small corner and apply hot glue to keep the piece in place. Try not to get too much glue on the outside of the piece. The cleaner you can keep it, the less you have to clean up, even though it's not hard to do. :P I continue to go all around the side of the piece, doing a small amount at a time and once I went all around the side, I then use MORE hot glue to glue on the inside seams to really help keep the piece in place. :) |
Folding Your Foam
Yes, it is possible to fold the foam pieces. Using this method allows you to create bigger, full pieces AND decreases the amount of glue seams on your armor. You just have to be VERY careful so you don't rip the foam, causing it to come apart.
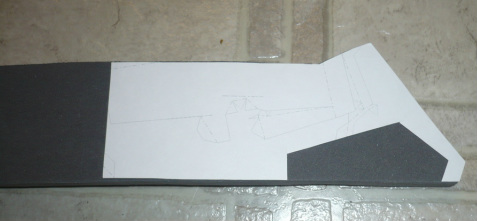
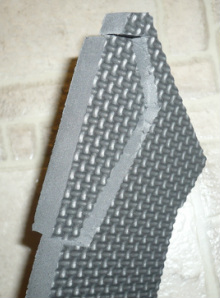
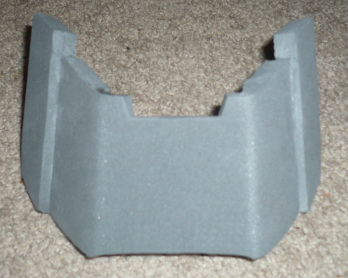
This is the backside of the part the goes over top of the Halo Reach boot. On the template I printed out, it showed the fold lines that you would normally fold on. What I did was flip my foam piece over with the texture side face up then I placed the template on top of that.
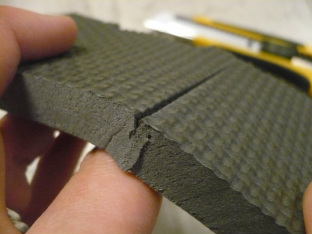
Next, I used an exacto knife to create a small notch in the foam at the top and bottom to show where my fold cut will be made. I then used a ruler and lined it up with my small cuts and use the exacto knife to press into the foam. That is the result you see in the image.
Next, I used an exacto knife to create a small notch in the foam at the top and bottom to show where my fold cut will be made. I then used a ruler and lined it up with my small cuts and use the exacto knife to press into the foam. That is the result you see in the image.
Once I had my line in place, I used my cutting blade to cut a little deeper into the foam while being careful NOT to cut too deep.

|

|
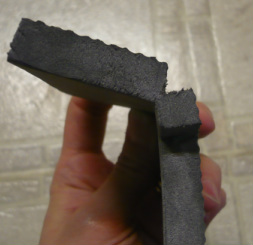
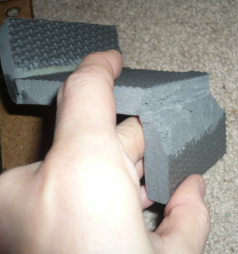
Now you want to make your angled cut so you can fold it. In the first image, you can see how I want the tip of my blade to be close to the cut I previously made. In the second image, I laid my piec flat and while holding my blade steady, I made an angled cut all the way down.
|
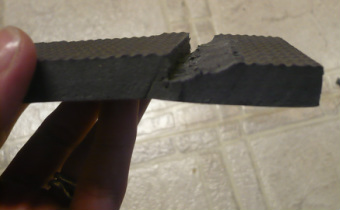
The end result is this.
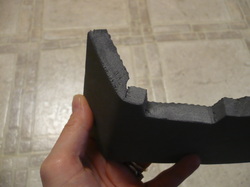
Now you can see that I am able to fold the foam to the angle I need. Since this particular piece does not require a "sharp" angle I only needed to to make an angle cut on one side of the fold line. It IS possible to create a 90 degree fold in foam, however, you will need to make an angle cut on BOTH sides of your fold line so that you can get a better fold in the foam. :)
In the following images, you will see how I glued my angle into place. In the first image, I opened up my fold line I cut into the foam. In the next image, you can see I applied a good glob of hot glue. The final picture shows the fold in place. The fold was a rough estimate to how far I needed the fold. I just had to make sure that it fit just right over the base of the shoe so that it sat properly. I already had the main part of the boot copmleted so I was able to hold this piece in place over the boot so I knew that I had it at the right angle.
|

|
|
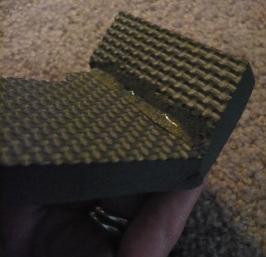
I then glued the angle on the other side, added the extra pieces where the black and yellow lines go and now this piece is complete and ready to be painted. :)
