HaloGoddess' Scale Guide
and other helpful tips for newcomers
Yes, I DID have this listed on the 405th, but I have decided to put the info here, and at the same time, update it to include answers to some questions that I still recieve for my scaling tutorial.
Not ONLY do I discuss how to scale your armor, but I will walk you through the steps from scale to print. This is GREAT information for people who are just starting out or have already attempted building, but are still having problems with getting their measurements correct. I KNOW there are other scaling methods out there, and some of them can be quite confusing, especially if you are REALLY bad at math like I am! lol
I will try my best to teach and walk you through the steps so that you can easily figure out how to measure yourself, learn the model setup in pepakura and teach you how to fully use pepakura. I do my best to explain everything throughoughly so that someone who is TOTALLY NEW to this sort of thing should have no problem figuring it out. :) Although I put the info here instead of just editing my thread on the 405th, you can STILL ask me questions in THAT thread on the 405th: http://www.405th.com/showthread.php/31627-HaloGoddess-quot-How-To-Scale-quot-and-More-Tutorial.
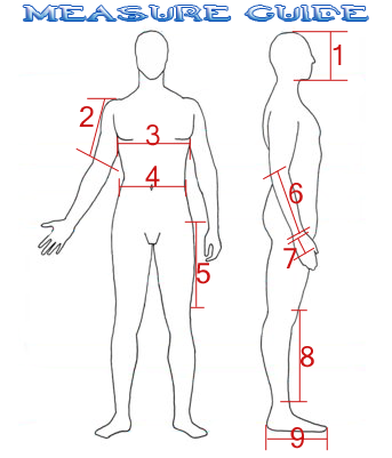
This guide basically shows the various areas you will need to measure for HALO armor builds. However, it is VERY important to pay close attention to the build you are doing. For example the forearm for the MK VI armor extends about an inch beyond the elbow, while the Halo Reach forearm does NOT, so MAKE SURE to look at images so you can see about where you need to measure from. This guide is mainly set up for a MK VI build, BUT it CAN be applied to any build as long as you understand the style of armor you are building.
Please refer to the following information for measuring while referring back to this guide. It's pretty simple to follow. :)
ONE VERY IMPORTANT MEASURING TIP TO ALWAYS REMEMBER, NEVER EVER, MEASURE ALL THE WAY AROUND. MEANING DON'T TAKE A MEASURING TAPE AND MEASURE ALL THE WAY AROUND YOUR WAIST, YOUR HEAD OR ANY OTHER PART. PEPAKURA IS NOT DESIGNED FOR THAT TYPE OF MEASURING. ALSO, JUST DON'T EVER USE A MEASURING TAPE. IT WILL MAKE GETTING THE RIGHT MEASUREMENT EVEN HARDER.
I have seen people in the past make this mistake and it was a VERY BIG mistake.
Another VERY important tip when you are measuring, MAKE SURE you already have planned what you will be wearing under your armor. If you are wearing something tight fitting, then you can easily follow the measuring instructions below. HOWEVER, some people like to wear that padded stuff under their armor and this WILL add more girth to YOUR natural body shape so MEASURE YOURSELF WHILE WEARING IT!!!!!!!
Another VERY good piece of advice, make sure you look at reference images of the costume you are building so you can see exactly where and how the armor is supposed to sit on YOUR body. This tutorial was mostly geared towards the Halo 3 MK VI costume. Let's say if your making a Halo Reach costume, the forearm pieces DO NOT sit on the arm the same way. The H3 forearm extends beyond the elbow, the Halo Reach does NOT. So STUDY what your build should look like and measure accordingly!!!!!!!
1. Measuring Your Head

Study the above image. Imagine that the grey rectangle is your ruler, tape measure, or whatever else you are using to measure with. The first 3 images obviously show you how to NOT measure your head. The last image is what you want to be doing when you are measuring your head for a helmet. If you are having a hard time trying to get the measurement just right, try asking for some help if anyone is around. Pretend you have a box and you have to measure from top to bottom.......think of measuring your head the same way.
Once you have this measurement, it's good to add AT LEAST 1 extra inch to leave room for padding. Also because when you fiberglass the inside, this also takes up space. If you plan on installing mini fans for better air circulation inside the helmet or lights, adding a total of 2 inches to your original measurement will help give enough room for all that extra equipment you wish to place in your helmet. :)
Once you have this measurement, it's good to add AT LEAST 1 extra inch to leave room for padding. Also because when you fiberglass the inside, this also takes up space. If you plan on installing mini fans for better air circulation inside the helmet or lights, adding a total of 2 inches to your original measurement will help give enough room for all that extra equipment you wish to place in your helmet. :)
2. SHOULDER/BICEP Measurement
An easy way to get this measurement.......you can bend your elbow at a 90 degree angle then starting from the INSIDE your arm (ya know where your arm bends lol) and go up about an 1 and a half. This will serve as a starting point. From there, just measure to the very top of your shoulder. You will see in the diagram where you need to measure to for the top of your shoulder.
TIP: Keep in mind that when doing the HALO REACH bicep pieces, they are different than the MK VI shoulder pieces since, depending on the model, you do NOT need to measure all the way to the top of your shoulder. This is why looking at reference images to see how the armor is supposed to go is important! SOME Halo Reach shoulder pieces are modeled with that piece that extends from the top, requiring that you measure to the top of your shoulder. Some do NOT so you MUST measure accordingly.
TIP: Keep in mind that when doing the HALO REACH bicep pieces, they are different than the MK VI shoulder pieces since, depending on the model, you do NOT need to measure all the way to the top of your shoulder. This is why looking at reference images to see how the armor is supposed to go is important! SOME Halo Reach shoulder pieces are modeled with that piece that extends from the top, requiring that you measure to the top of your shoulder. Some do NOT so you MUST measure accordingly.
3. Chest Measurement
This is a pretty easy area to measure for. Just like with measuring your head, DO NOT allow whatever you are using to measure to bend. This CAN throw off your measurement. One thing you can try is this.......if you are using a ruler, place it flat between your index and middle finger in each hand. Be sure to have a tighter grip with the hand at the 1 inch mark. Make sure your hands are already spread apart on the ruler and while still holding the ruler, bring your hands up to your armpits and act as if you are going to squeeze the side of your ribs with your hands. lol I know it sounds weird trying to explain it like that, but it works! :P Since you do NOT want your armor to be TOO tight, add AT LEAST 1 more inch to that measurement. If you are afraid that the measurement may still seem too tight, go ahead and add another inch.
If you are doing a foam build, 1 extra inch should be good enough since the foam will be more flexible and should not cause any bad strain on mobility, hurt your ribs, or bother any other part of your chest and still allow you to breath just fine. :P
If you are doing a foam build, 1 extra inch should be good enough since the foam will be more flexible and should not cause any bad strain on mobility, hurt your ribs, or bother any other part of your chest and still allow you to breath just fine. :P
4. Waist Measurement
This part can vary slightly between the guys and the girls. Some girls may have a tiny waist, but you do NOT want to measure that area. For girls, you will want to measure the widest part of your HIPS and you can achieve this measurement by holding the ruler the same way I explained for chest measurement. For the guys, I have never seen a guy with a tiny waist and wide hips :lol: so what the guys can do is locate your hip bone on both sides.......got that? :P Now, go up about an inch from there and measure from side to side, again, you can do it the same way you did for the chest measurement. If for some odd reason your waist area does seem smaller than the width of your hips, than go with the widest measurement.
For a foam build, adding 1 inch should suffice for this and same goes for the standard pep method. However, if you are afraid it may still be too tight, add 1 more inch for a total of 2 inches on top of your original measurement.
Now, I am NOT trying to sound mean, but I have seen some guys with them "beer bellies". :P When you measure, just make sure you measure right under your gut or else your belt may be too tight and you will not be comfortable.
